It’s no secret that I love Scrivener and have since I first bought it back in 2016. In fact, here’s my first ever post about it: Writers, Should You Get Scrivener? Granted, I’ve learned a lot about Scrivener since 2016, and the software has upgraded, which is why I thought an updated post talking about my favorite features might give some insight into those who are curious and/or help out those who have it but feel lost.
Before I begin, I want to clarify that this isn’t a paid promo. Scrivener has NO CLUE I am writing this. I am just a regular author, who bought and explored the software all on my own, and I’ve used it ever since. These are my favorite features and ones I actually use every day.
1. Keeping Track of Writing Stats (Including Overused Words)

The other day online, a fellow writer asked me how I kept track of my stats. (For those of you who don’t follow me on Twitter, I often chat about how many words I write a day, or month, and what that means to me and why.) I’ve always been a numbers person. Spreadsheets are where I LIVE. I tend to use them in retrospect, meaning I like to look back at what I accomplished every month, and seeing all that work helps me stay motivated the next month. (I’m the type to feel like I didn’t do anything if I don’t have something tangible in front of me, and since writing tends to be on a virtual space, my spreadsheets become that tangible thing.) Scrivener actually tracks stats for you. Select Project from the top menu, then Writing History, and it will break down your averages for you, day-by-day, and monthly. In March, I wrote on average 1,193 words a day, but if you look at the breakdown, I have days I never wrote as well as negative days (days where I deleted more than I added). It’s really interesting because you might also notice patterns. Ex. I wrote 3,365 in one day. If you check March 22, you might notice that’s a Sunday. Of course I was more productive. I wasn’t at work. 😛 If you really want to go deep, explore Project->Statistics->Selected Documents->Word Frequency, and it’ll show you your most frequently used words. Might help you find those pesky repeats that you can change or cut.
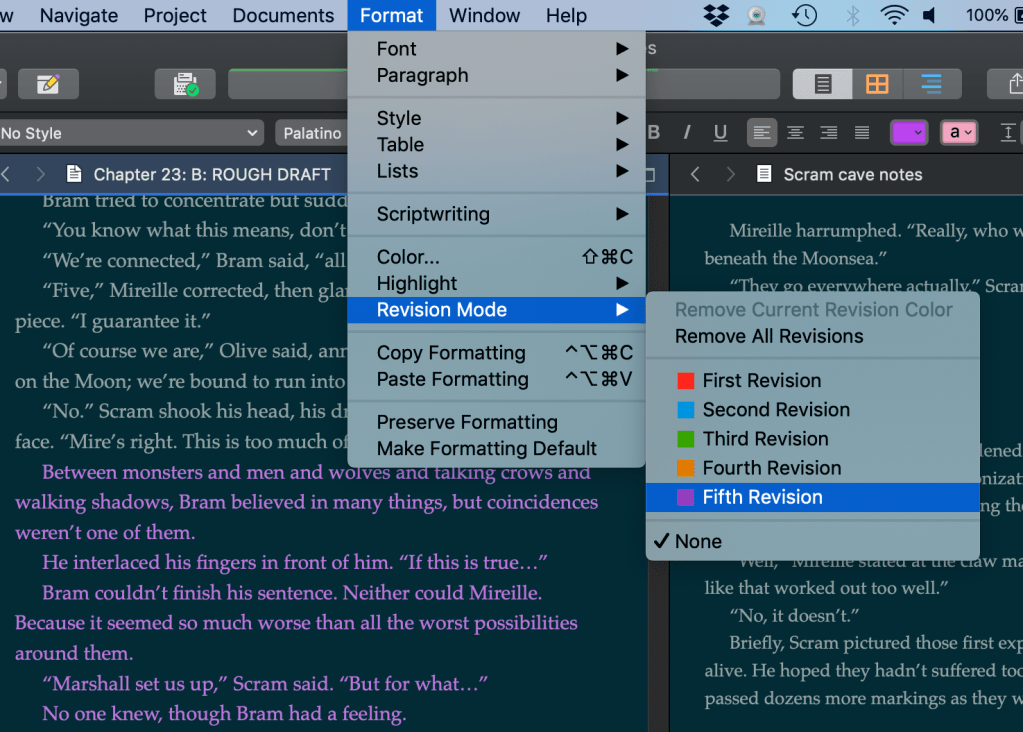
2. Color Coding revisions
I didn’t want to start with this one, because I’ve been talking about it on the blog a lot. Like, a lot a lot. In fact, I just wrote a blog post—How I Revise My Novels—about this very topic. I use the Revision Mode in Scrivener all the time, even while I’m initially creating, but I mostly use it when I’m revising. To get there, you’re going to want to click, Format->Revision Mode->Select Color. Be warned: Once you’re in that mode, you will have to turn it off to get back to another color. I love this because it helps me keep my revisions straight. But another tool that does that is the snapshot features.
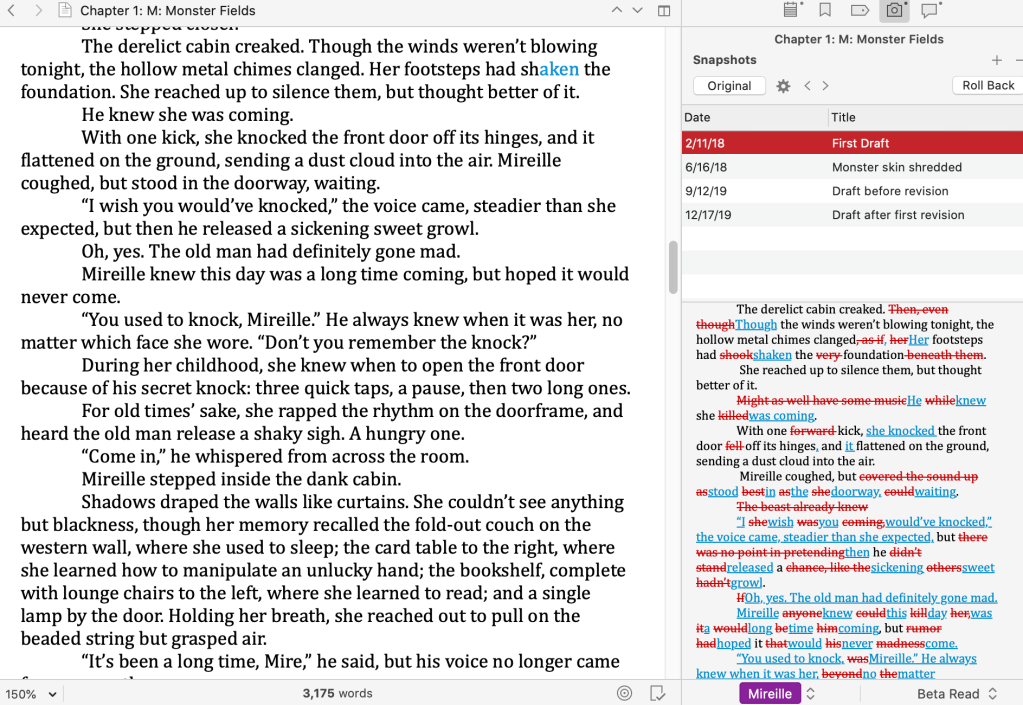
3. Snapshots of previous versions
The Snapshot feature allows you to save various versions of your book. I have screenshot me snapshotting. (I hope that makes sense.) You can find that screenshot below. Basically, after every time I finish writing a chapter (or revising it), I take a snapshot. (Which is the little camera icon on the far right.) I name the file something that makes it clear to me what version it is and hold onto them. This is super helpful while revising, mostly because you can go back if you realize Version 2 was better than Version 3. You can also click the “Compare” button and it will show you the differences. The photo below is showing you my very first draft compared to my most recent draft. As you can see, there were a lot of changes. In fact, you can see from this photo that I’ve been writing this scene since February 2018, I’ve rewritten it four times, and had it beta read. Another huge feature that I use in this part of Scrivener is the Comments button to add comments from betas, but that’s another feature entirely!
4. Linguistic Focus

Under Edit -> Writing Tools -> Linguistic Focus, you’ll find an array of options: Nouns, adverbs, dialogue, etc. This is one of my favorite tools (and one I think is often overlooked), because it allows you to look at any given file in one way. Looking to cut out those pesky adverbs? Highlight them. Wanting to see how realistic your dialogue feels without the action tags? Make it stand out. In my screenshot on the right, I highlighted my dialogue only. It helps me see the spacing, but also lets me focus on the flow of my characters’ speech. I mostly use this for dialogue, but I’ve definitely used it for other things, too. What’s really neat is how it counts it, too. For instance, I had 93 quotes in this chapter, 944 verbs, 210 adjectives. Granted, it isn’t always perfect, but it definitely speeds up the process of cutting out certain phrases.
5. Character Name Generator
Okay, so I admit, I don’t use Scrivener to get my character names. However, I think it’s an awesome tool that is often overlooked, and it’s found in the same place: Edit -> Writing Tools -> Name Generator, and you can select from a variety of choices: names by country origin, first letter, ending letter, alliteration, and more. If you’re curious how I actually name my characters, read my blog post Naming Your Characters. Mostly, I use Babynames.com, yearbooks, and Pinterest boards. The reason I included it in my top five despite not using it is to highlight how neat all the options and tools are, even if I don’t personally use them during my writing journey.
These are just my top five tips, but honestly, I could go on forever. Scrivener has a countless number of tools, like the progress bar and target goals. It can honestly be overwhelming (but in a good way). I admit I don’t use all the tools it offers, but isn’t that the beauty? You can use what you need and want to pursue your art. But first, you have to understand what they offer and why, which is why I want to leave you with one last tip—my #1 tip.
My #1 tip? Take the time to go through the tutorials when you download it. Without them, I would’ve been lost and confused, either giving up completely or struggling along with very few of the tools Scrivener has to offer.
Are there tools you love?
Let me know if I missed your favorites! Maybe there’s a feature I would love but have yet to hear about or use.
~SAT
P.S. If you’ve ever wanted to attend any of my events but couldn’t due to distance, now is your time to shine! I’ll be teaching a publishing course virtually on Monday, April 20: Online Publishing Events and Opportunities at 6:30 PM (Central). It’ll be on Zoom, and you can find more details on The Story Center’s Facebook by clicking here. See you then!
Discover more from Shannon A. Thompson
Subscribe to get the latest posts sent to your email.

These were great tips, Shannon. Number 1 and 4 were particularly bomb. I immediately open a S. project and began noodling around! Very cool.
All the best.
So glad you enjoyed them! Hope they added some extra inspiration for today’s WIP!
~SAT
I’m just getting used to Scrivener. This will really help. Thank you 😀
Good luck with your project! Thank you for reading and commenting. Scrivener has definitely helped me over the years.
~SAT
Reblogged this on Liquid Plaid and commented:
I love Scrivener and have been using it for years. However, there can be a little bit of a learning curve if you are used to using Word or Google Docs. Lately, I have been using some of the features in the corkboard to keep track of my thesis submissions to make sure I am not submitting the same words.
This means I am always looking for tips and tricks to use Scrivener and some of these I never thought about but are now on my list of things to look into. 🙂